
3ds Max Rain Setup


For the backwall anything can work (even an HDRI) in this case we have just a plane with a photo of some buildings as texture; this will be out of focus anyway so no need to spend time on it.


LIGHTING SETUP


Below is how the distance map look if connected to the diffuse of a blank material; this is usually one of the best ways to really understand what every component is doing to your map
More posts
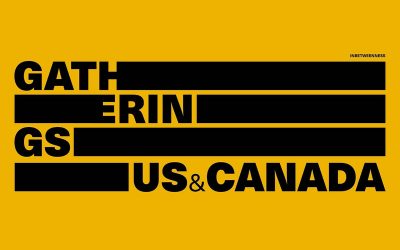
Gatherings US & Canada INBETWEENNESS
We are honored to be invited to talk about our studio and the process behind our work on the Gatherings US & Canada 2020 organized by INBETWEENNESS, a networking movement that promotes the art of architectural visualisation all over the world, by creating events and sharing resources, such as podcasts, films, articles, workshops, and among others.
Quick Environment Script V2
After over 2000 lines of code and lots and lots of testing, the new version of our Quick Environment Script is out. Get it on Gumroad! Link inside.
Quick Environment Script (QES)
This is a maxscript that was written for internal use at Moso Studio.The purpose of QES is to streamline the process of working with HDR files.
Quick Lighting Script
We have been using this tool internally for a few years now. It was written to make the process of playing with lighting iterations quicker.
Strange Behavior of Corona Render (bug?)
What we found when using a texture to modify the FresnelIOR (metalness) of an object using Corona Render is at the very least strange.
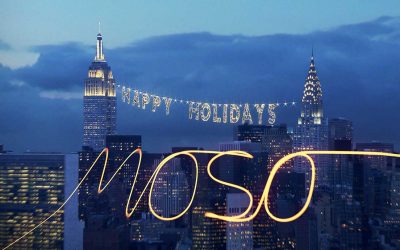
The Making of Our Holiday Card 2016
The concept behind our 2016 Holiday Card was pretty simple, we were going to hang a holiday ornament wire from the Empire State building to the Chrysler building. We initially thought we may just do a still image, base on some photos we took from a helicopter for a previous project.

Bullet-time / Frezee-time MAXScript
When none of the Bullet Time effect Scripts we found was exactly what we wanted we decided to just write a simple one that did just what we needed.
From Canon to Sony cameras (our experience)
Why we as a studio transitioned from Canon to Sony cameras not for a matter of image quality but in order to achieve portability.
Testing the waters with VR Unreal Engine
Experimenting with Unreal Engine for a 360 sequence for the Missoni Baia project. We hope to include a tutorial on the process at some point with Unreal Datasmith.
Subscribe to Our Newsletter
We won't spam!